
Size
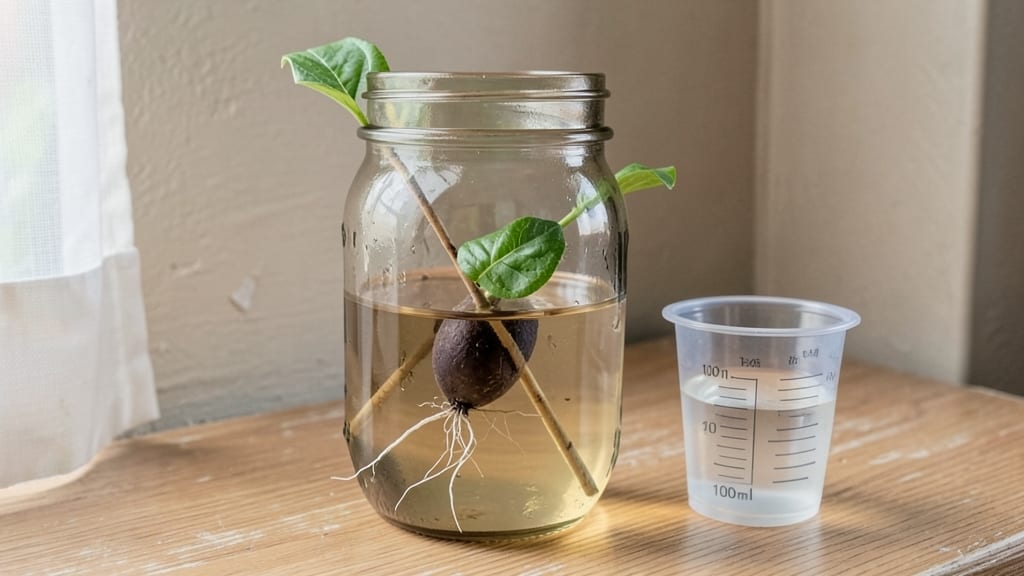
Growing an avocado seed in water feels like nurturing a tiny miracle—one that could turn into a houseplant with patience and care. 🌱 The process starts with just a seed, a glass of water, and a few weeks of watching roots emerge from what was once a kitchen scrap.
I’ve tried this with my kids, and even the most impatient little gardeners get hooked watching those first roots unfurl like tiny green fingers. You’ll need just three things: a fresh avocado pit, a glass of water, and toothpicks or a knife to suspend the seed.
The key is keeping the water clean and the seed exposed to bright, indirect light—no fancy equipment required. Most people quit too soon, but sticking with it for 6-8 weeks often rewards you with a 2-3 inch root system ready for planting.
Once roots appear, you’ll notice new leaves pushing through the seed’s top, signaling it’s ready for soil. The transition to a pot feels like graduation day—suddenly, your kitchen experiment becomes a real plant with potential.
Just be patient; some seeds take months to sprout leaves, but every stage is worth watching. This project works anywhere with a sunny windowsill, and the best part? You’re not just growing a plant—you’re teaching yourself (and kids) about patience, cycles, and the magic of starting small.
Let’s get those roots growing!
📚 In This Guide
- What you need
- Instructions
- Tips and common mistakes
- Wrapping up and next steps
What you need
- ● Fresh avocado pit – Choose a ripe, organic avocado (like Hass) with a firm, unblemished seed.
- ● Sharp knife or peeler – For carefully removing the seed from the fruit.
- ● Toothpicks (3-4) – Bamboo or plastic (avoid metal, as it can corrode).
- ● Glass or jar – A clear container (16-24 oz) with a wide mouth for easy access.
- ● Water – Room-temperature, filtered or chlorine-free water (change weekly).
- ● Patience & sunlight – A bright, indirect light spot (e.g., near a window).
- ● Hydroponic nutrients – A diluted solution (like seaweed extract) to boost root growth.
- ● Small pebbles or marbles – To weigh down the pit and keep it submerged.
- ● Planting pot & soil – Well-draining potting mix (for transplanting later).
- ● Humidity dome or plastic wrap – To retain moisture while roots sprout.
Step-by-Step instructions for growing avocado roots in water
Here's how I turn a simple pit into a thriving root system—no soil, no fuss.
🌱 Step 1: Prepare the Avocado Pit
Start by washing the avocado pit thoroughly under running water to remove any leftover fruit flesh. I scrub it gently with a soft brush to ensure no residue remains—this prevents mold and keeps the water clean. The key here is patience: let the pit dry completely for 24 hours before moving on. You'll know it's ready when the surface feels dry to the touch.
Next, insert 3-4 toothpicks evenly around the middle of the pit—about halfway between the top and bottom. Angle them so they can later suspend the pit above a glass of water. This creates the perfect gap for roots to grow downward while keeping the top exposed to air. I like to use toothpicks because they're sturdy enough to hold the weight but won't damage the pit if adjusted later.
💧 Step 2: Suspend the Pit in Water
Fill a wide-mouth glass with 3-4 inches of room-temperature water—enough to cover about 1 inch of the pit's bottom. The water level is critical: too little and the pit won't stay hydrated; too much and the top will rot. I use a clear glass so I can monitor water levels and root progress easily.
Gently place the toothpicked pit on top of the glass, ensuring the toothpicks rest on the rim. The bottom 1 inch of the pit should be submerged in water, while the top remains dry. Change the water every 3-4 days to prevent bacterial growth. You'll see tiny white roots emerge within 2-4 weeks, starting as fuzzy strands that thicken over time.
☀️ Step 3: Provide Warmth and Indirect Light
Position the glass in a spot with bright, indirect light—like a south-facing window with sheer curtains. Direct sunlight can overheat the water and damage delicate roots. I keep my setup near a kitchen window where it gets morning sun and afternoon shade. The ideal temperature range is 70-75°F, which most indoor environments naturally provide.
Watch for roots that grow 2-3 inches long before considering transplanting. Roots will darken as they thicken, and you might even see small root hairs forming. If the water level drops significantly between changes, top it off with fresh water—but never submerge more than 1 inch of the pit. This balance keeps the roots hydrated without drowning the pit.
🌿 Step 4: Transition to Soil (When Ready)
Once roots reach 2-3 inches, it's time to prepare for soil. Fill a small pot (6 inches wide) with well-draining potting mix—I mix equal parts potting soil and perlite for extra aeration. Moisten the soil until it's damp but not soggy, then dig a hole deep enough to bury the pit halfway (about 2 inches deep).
Gently remove the pit from the water, letting excess moisture drip off. Place it in the hole, firming soil around the base to hold it upright. Water lightly to settle the soil, then place the pot in bright, indirect light again. Keep the soil consistently moist (not wet) for the first 2 weeks—this helps the roots adjust to their new environment. You'll see new leaves emerge within 4-6 weeks, signaling successful growth.
Tips & tricks for growing avocado roots in water
Common pitfalls—and how to sidestep every one—when growing avocado roots from seed.
Drying Time Matters: That 24-hour drying period in Step 1 is non-negotiable. I learned this the hard way after seeing mold develop on pits I rushed to plant. Place the pit on a paper towel in a dry, well-ventilated spot away from direct sunlight. If you're impatient, you can speed up drying by using a fan on low setting—just make sure the pit doesn't crack or dry out too much.
Toothpick Placement: When inserting your 3-4 toothpicks in Step 1, aim for perfect symmetry. I angle them slightly outward to create a stable triangle that supports the pit's weight. If toothpicks slip, try using slightly larger ones or securing them with a tiny dab of hot glue (just a drop!) at the base—this keeps them from shifting while the roots grow.
Water Level Watch: The 1-inch submersion rule in Step 2 is crucial, but here's the secret: use a clear glass with measurement markings. I mark my glass at the 1-inch level with a permanent marker so I can quickly check without guessing. If roots start growing toward the surface, it's time to change the water—this prevents them from becoming waterlogged and turning brown.
Lighting Strategy: For Step 3's bright indirect light, I've found that rotating your setup quarter-turn daily helps roots grow evenly. Place a mirror nearby to reflect light onto the darker side of the glass—this mimics natural sunlight patterns. If you notice roots growing only on one side, it's your cue to adjust the position or add more light sources.
Pro Tips for Grow An Avocado Seed In Water
- Common pitfalls—and how to sidestep every one—when growing avocado roots from seed.
- Drying Time Matters: That 24-hour drying period in Step 1 is non-negotiable. I learned this the hard way after seeing...
- Toothpick Placement: When inserting your 3-4 toothpicks in Step 1, aim for perfect symmetry. I angle them slightly ou...
Frequently asked questions
Got questions about growing an avocado seed in water? You’re not alone! Here are answers to the most common queries to keep your little seedling thriving.
How long does it take for an avocado seed to sprout in water?
Patience is key! Most avocado seeds take 2–6 weeks to sprout roots in water. Some may take longer, especially if the seed is older or the water conditions aren’t ideal. Keep the water fresh and warm (around 70–75°F) to speed things up.
Do I need to change the water every day?
Not necessarily! Change the water every 2–3 days to prevent mold or bacteria buildup. If the water smells funky or looks cloudy, it’s time for a refresh. Use room-temperature water to avoid shocking the seed.
What if my avocado seed isn’t sprouting?
Don’t worry—try these fixes:
- Check the seed: Some seeds (especially large or dried ones) may never sprout. Start fresh with a new seed if yours shows no signs after 6 weeks.
- Adjust the water: Ensure only 1–2 inches of the seed are submerged; too much can rot it.
- Warmth matters: Place the jar near a sunny window or use a seedling heat mat for consistent warmth.
Can I plant the seed in soil before roots are 2–3 inches long?
Yes! Once you see 1–2 inches of roots, you can transfer it to soil. Wait until roots reach 2–3 inches for better stability, but don’t delay too long—long roots can get tangled. Use well-draining potting mix and keep the soil moist (not soggy).
What if my avocado seed grows mold or smells bad?
Mold or a foul odor means it’s time to act:
- Rinse the seed: Gently scrub off mold with a soft brush and fresh water.
- Dry it out: Let the seed air-dry for 10–15 minutes before returning it to clean water.
- Prevent future issues: Use filtered or bottled water and avoid overcrowding in the jar.
Wrapping up and next steps
Growing an avocado seed in water is a fun, rewarding, and eco-friendly project that anyone can try! With just a few simple steps—patience, consistency, and a little love—you’ll watch roots sprout and transform into a thriving plant.
Once your seedling is ready, the next exciting step is transplanting it into soil to give it room to grow into a full avocado tree. 🌱✨
Don’t let small setbacks discourage you—even if your first attempt isn’t perfect, every gardener learns along the way. Now that you’ve mastered the basics, why not experiment with different soil mixes or care techniques to keep your plant flourishing? Happy growing!