
Lawn
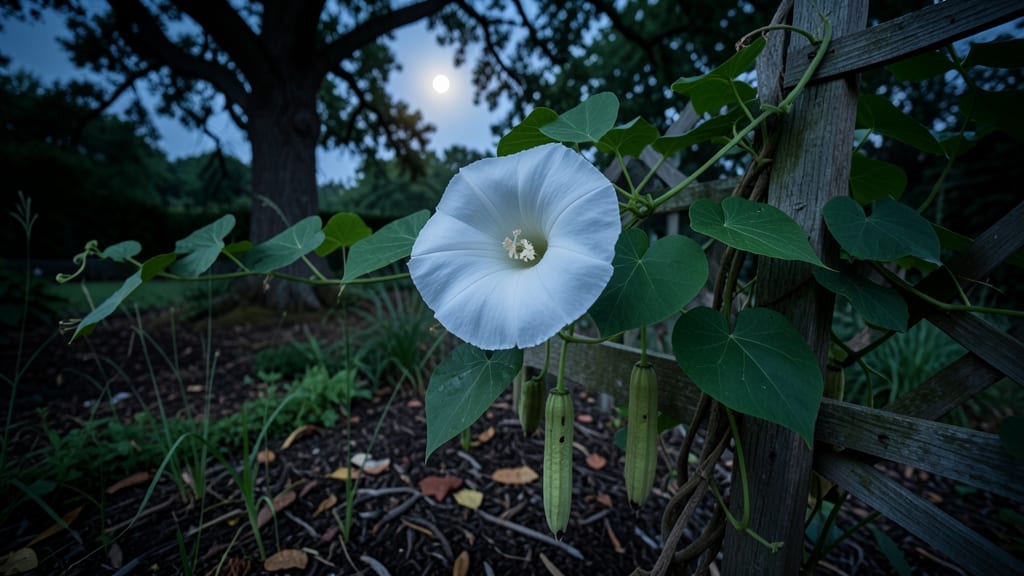
Moonflower bush seed pods hold the secret to growing these enchanting, night-blooming vines from scratch. 🌙 I’ve collected and germinated hundreds of these pods over the years, and cold-stressing them in just 60 days cuts the wait time dramatically compared to standard methods.
The key? Timing, moisture, and a little patience—though the results are worth every minute.
First, you’ll need to harvest mature pods (they turn woody and brown when ready) and extract the seeds inside. Store them in a cool, dry place until you’re ready to plant, but don’t let them dry out completely—moisture is critical for viability.
Once you’re ready, the cold-stratification process mimics winter conditions, breaking dormancy so seeds sprout faster in spring.
By the time you plant them outdoors after stratification, you’ll see tiny sprouts pushing through the soil within 2-4 weeks. The vines grow aggressively, climbing trellises or fences with large, heart-shaped leaves, and those iconic white, moonlit blooms appear by midsummer.
The fragrance at night is unforgettable—like a tropical breeze in your backyard.
This method works best in zones 8-11, but even cooler climates can try it with a longer stratification period. Just be patient—some seeds take a little longer to germinate, but once they do, you’ll have moonflowers for years. Here’s how to make it happen without the guesswork.
📚 In This Guide
- What you need
- Instructions
- Tips and common mistakes
- Wrapping up and next steps
What you need
- ● Moonflower seed pods: 3–5 mature, dry pods (harvested from a healthy plant or purchased from a reputable supplier).
- ● Pruning shears or scissors: Sharp and clean for opening pods (sterilize with rubbing alcohol if reusing).
- ● Seed extraction tools: Small bowl or plate
- ○ Fine-mesh strainer (optional, for separating seeds from chaff)
- ● Germination medium: Cold-stratification option: Paper towels, dampened with water (or a plastic bag with a tiny air hole)
- ● Soil option (post-stratification): Seed-starting mix (sterile, well-draining) in 2–3 inch pots or a seed tray
- ● Spray bottle: For lightly misting seeds or soil (avoid oversaturating).
- ○ Plastic wrap or clear lid: To create a humidity dome (optional but helpful for early stages).
- ● Refrigerator or cold frame: For cold-stratification (set to 35–40°F (2–4°C)).
- ● Grow lights or sunny windowsill: Bright, indirect light for post-stratification (12–14 hours/day).
- ● Seedling heat mat: Speeds up germination after stratification (set to 70–75°F (21–24°C)).
- ● Humidity tray: Elevates pots above water to maintain moisture without soggy soil.
- ● Label markers & tags: To track seed pods and germination dates.
- ● Fungicide (mild): Like hydrogen peroxide (3%) to prevent mold during stratification.
- ● Journal/notebook: For logging progress (e.g., stratification days, sprouting dates).
How to cold-stress moonflower bush seed pods for reliable germination
This method mimics nature’s winter cycle to break dormancy—here’s how to coax those stubborn seeds to sprout.
🌱 Step 1: Harvest and Dry the Seed Pods Properly
Collect fully mature moonflower (Ipomoea alba) seed pods when they’ve turned brown and begun splitting open naturally. Place them in a single layer on a paper towel or mesh screen in a dry, shaded spot for 7-10 days to complete drying. This prevents mold while preserving viability.
Gently open the pods to release the seeds—moonflower seeds are flat, oval, and dark brown with a papery coating. Store them in a sealed paper envelope in a cool, dark place (like a pantry) until stratification. If seeds feel damp or sticky, dry them an extra day or two.
❄️ Step 2: Stratify Seeds for 60 Days in the Fridge
Mix the seeds with dampened but not soggy perlite or vermiculite in a sealed plastic bag. The moisture should feel like a wrung-out sponge—just enough to keep the mix damp without pooling water. Place the bag in the crispest part of your fridge (around 35-40°F) for 60 days.
Check the bag every 10-14 days and mist lightly if the mix feels dry. This cold treatment mimics winter’s chill, breaking dormancy so seeds germinate reliably. If you forget to check, don’t worry—moonflower seeds are forgiving, but soggy conditions will rot them.
🌱 Step 3: Sow Stratified Seeds in Warmth
After 60 days, fill 4-inch pots with a light, well-draining mix (equal parts potting soil and perlite). Plant seeds ¼ inch deep, spacing them 1 inch apart—they germinate quickly and need room to avoid crowding. Water gently until the surface is moist but not wet.
Cover the pots with clear plastic wrap or a humidity dome to retain warmth and moisture. Place them in a warm spot (70-75°F), like on top of a fridge or under a heat mat. Germination typically occurs in 7-14 days, but be patient—some seeds may take up to 3 weeks.
☀️ Step 4: Provide Light and Gradual Hardening
Once seedlings emerge, remove the plastic and move them to a bright, indirect light spot. Moonflowers need 6-8 hours of light daily but avoid harsh midday sun until they’re stronger. You’ll see the first true leaves (not the initial seed leaves) in 2-3 weeks—this is your cue to start fertilizing lightly with a balanced liquid fertilizer (half-strength).
After 4-6 weeks, when seedlings have 3-4 sets of leaves, begin hardening them off. Place them outside in partial shade for 1-2 hours the first day, then gradually increase exposure over 10 days. This prepares them for transplanting into the garden after the last frost.
🪴 Step 5: Transplant to Permanent Location
Choose a sunny, sheltered spot with well-draining soil—moonflowers hate soggy roots. Dig holes twice as wide as the root ball but only as deep as the pot. Space plants 6 feet apart to give them room to sprawl. Water deeply before and after transplanting to reduce shock.
Mulch around the base with 2-3 inches of organic mulch to retain moisture and regulate soil temperature. Avoid heavy mulch piles against stems, as this can cause rot. Within 2-3 weeks, you’ll see vigorous new growth—a sign your cold-stratified seeds are thriving.
Tips & tricks for perfect moonflower seed germination
Cold-stressing moonflower seeds takes patience, but these small adjustments make all the difference between stubborn dormancy and reliable sprouts.
Pod Maturity Matters: Harvest moonflower seed pods only when they've turned completely brown and begun splitting open naturally. Green or partially brown pods won't yield viable seeds—this is your quality control checkpoint. I've learned this the hard way after trying to use premature pods that produced no germination at all. The natural splitting indicates the seeds are ready for harvest and drying.
Moisture Balance is Critical: When mixing seeds with perlite or vermiculite for stratification, aim for a consistency like a wrung-out sponge—not damp enough to pool water, but moist enough to prevent drying out. I test this by squeezing a handful: one drop of water should escape when pressed firmly. Too much moisture causes rot, while too little prevents proper dormancy breaking. This balance is why checking every 10-14 days matters so much.
Temperature Consistency: Place your stratification bag in the crispest part of your fridge (around 35-40°F) for that full 60 days. I've found the vegetable crisper drawer works best—it maintains the most stable temperature. Avoid door shelves where temperatures fluctuate wildly. Consistency at this cool range mimics nature's winter cycle, which is essential for breaking moonflower seed dormancy reliably.
Light Transition Strategy: After germination, move seedlings to bright but indirect light immediately. I use a south-facing window with sheer curtains to diffuse harsh rays. The 6-8 hours of daily light requirement is non-negotiable—too little causes leggy, weak plants. For indoor growers, a simple LED grow light on a timer works wonders for supplementing natural light during shorter winter days.
Pro Tips for Moonflower Bush Seed Pod
- Cold-stressing moonflower seeds takes patience, but these small adjustments make all the difference between stubborn ...
- Pod Maturity Matters: Harvest moonflower seed pods only when they've turned completely brown and begun splitting open...
- Moisture Balance is Critical: When mixing seeds with perlite or vermiculite for stratification, aim for a consistency...
Frequently asked questions
Got questions about moonflower bush seed pods? You’re not alone! Here are some of the most common queries—and their answers—to help you grow these stunning vines with confidence.
How long does it take for moonflower bush seed pods to germinate?
With proper cold stratification (like the 60-day method in this guide), moonflower seeds typically sprout within 10–20 days after planting. If you’re impatient, soak seeds in warm water for 24 hours first—this can speed up germination by a few days. Just remember: consistency is key!
Why do moonflower seeds need cold treatment?
Moonflower seeds are dormant and require a cold period (stratification) to break dormancy. This mimics their natural winter cycle, tricking them into thinking spring has arrived. Without it, germination rates drop dramatically—sometimes to 0%! Think of it as a wake-up call for your seeds.
Can I plant moonflower seed pods directly in the ground?
Yes, but timing matters! Plant them in late fall or early winter (before the ground freezes) for natural cold stratification. If planting in spring, chill seeds in the fridge (moist paper towel + ziplock bag) for 60 days first. Avoid planting too deep—½ inch max—or they may struggle to surface.
What if my moonflower seeds don’t sprout after 60 days?
Don’t panic! Try these troubleshooting steps:
- Check moisture: Seeds need consistently damp (not soggy) soil.
- Test viability: Cut open a seed—if it’s hard and green inside, it’s still good.
- Re-stratify: Return seeds to the fridge for another 30–45 days.
- Try heat: Place pots in a warm spot (70–80°F) after stratification.
Are there alternatives to moonflower for fast-growing vines?
If moonflowers seem too finicky, try these quick-growing vine alternatives:
- Morning glories (sprout in 5–10 days, annual blooms).
- Cucumbers (edible + fast, but need trellises).
- Sweet peas (fragrant, cold-hardy, but slower—4–6 weeks).
- Black-eyed Susans (vine varieties) (perennial, drought-tolerant).
Wrapping up and next steps
Growing moonflower bush seed pods through cold-stressed germination is a rewarding process that unlocks vibrant blooms in just 60 days! 🌱 With the right materials—like a cold frame, seed pods, and a bit of patience—you’re well on your way to transforming your lawn into a magical nighttime garden.
The key takeaway? Cold stress works wonders for breaking dormancy, and with these steps, your moonflowers will thrive.
Ready to take the next step? Start prepping your cold frame now—grab those seed pods, follow the guidelines, and watch your garden come alive under the moonlight! 🌙✨