
Lawn
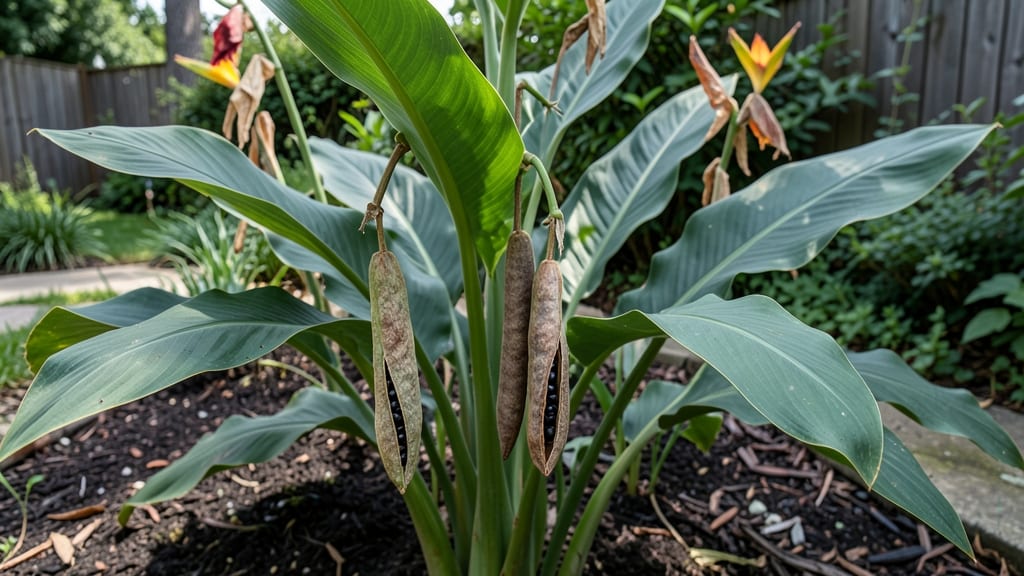
Harvesting canna seed pods before they twist saves seeds and future plants. ✨ I’ve wasted years of seeds by ignoring this simple trick—until I learned the exact moment to pick them for maximum germination.
The difference between a thriving canna patch and a sad, shriveled mess often comes down to timing.
Look for pods that turn from green to a papery brown, then split open slightly at the top—this is your cue. Twisting happens when pods dry too long on the stalk, so harvest them before they curl or shatter.
A sharp pair of pruners and a dry paper bag are all you need to collect them without damage.
Once you’ve gathered the pods, crack them open to reveal the plump, dark seeds inside. These are your future cannas—just plant them shallowly in moist seed-starting mix and keep them warm. Within 2-3 weeks, you’ll see those first tiny shoots pushing through, proof that your patience paid off.
If seeds mold or take too long to sprout, it’s usually from overcrowding or dampness. Thin seedlings early and use a humidity dome if your climate is dry.
Before you know it, you’ll have a stand of cannas that rivals what you’d pay for at a nursery—all from seeds you harvested yourself.
📚 In This Guide
- What you need
- Instructions
- Tips and common mistakes
- Wrapping up and next steps
What you need
- ● Sharp pruning shears or garden scissors – Choose bypass-style shears (8–10" blades) for clean cuts without crushing pods.
- ● Gloves (cut-resistant or gardening) – Protects hands from thorns and sap.
- ● Large bucket or tray (5+ gallons) – For collecting pods and preventing spills.
- ● Paper towels or newspaper – To cushion pods during transport and drying.
- ○ Permanent marker – Optional but helpful for labeling pods if saving seeds.
- ● Spray bottle with water – Keeps pods hydrated if harvesting in hot/dry conditions.
- ● Drying rack or screen – Elevates pods for even airflow (use mesh or wire shelves).
- ● Humidity tray (with silica gel) – Speeds up drying if your climate is damp.
- ● Disinfectant (70% isopropyl alcohol) – Wipes down tools between cuts to prevent mold.
- ● Seed-saving envelopes – For storing seeds long-term (label with variety/date!).
Step-by-step guide to harvesting canna seed pods without twisting
Here's the foolproof method I use every year to collect canna seeds without the frustrating twist-and-snap mess.
🌿 Step 1: Identify and Locate the Seed Pods
Canna seed pods form at the base of the flower stalks after blooms fade. Look for the small, round, green pods that appear about 6-8 weeks after flowering. They start as pea-sized bumps and grow to about 1-2 inches in diameter when mature.
Gently run your fingers along the flower stalks—you'll feel the pods before you see them. The trick is to harvest them when they're fully green but just starting to turn brown at the edges. This is their peak firmness, before they twist and crack open on their own.
💧 Step 2: Prepare for Harvesting
Work on a dry, sunny day when the pods are at their firmest. You'll need a pair of sharp pruning shears (not scissors—they crush the pods) and a small bowl or paper bag to collect them. I like to wear gloves because the pods can be slightly sticky when ripe.
Snip the entire flower stalk at its base with the shears, leaving about 1 inch of stem attached to each pod. This prevents the pods from twisting off when you handle them. Place the cut stalks in your collection container immediately—don't leave them lying around, or curious critters might snatch them.
✂️ Step 3: Harvest and Store the Seed Pods
Take the stalks indoors to a well-ventilated area. Lay them out on a clean towel or newspaper. The pods will continue to ripen over the next 3-5 days, so patience is key. Check them daily—when they turn completely brown and feel slightly papery, they're ready for seed extraction.
Open each pod carefully by making a small slit along its seam with your fingernail or a butter knife. You'll hear a satisfying pop as the pod splits open. Empty the seeds into a small bowl. Discard any pods that feel mushy or have mold—these won't produce viable seeds.
🪴 Step 4: Dry and Store Seeds Properly
Spread the seeds on a paper towel in a single layer. Place them in a warm, dry spot away from direct sunlight for 7-10 days to dry completely. They're ready when they're hard to the touch and no longer stick to your fingers. This drying process prevents mold and ensures long-term storage viability.
Once dry, transfer the seeds to a small paper envelope or airtight container. Label it with the canna variety and the harvest date. Store in a cool, dark place like a pantry or seed drawer. Properly stored, canna seeds remain viable for 2-3 years, though germination rates drop after the first year.
⏰ Step 5: Plant Your Seeds at the Right Time
Canna seeds germinate best when planted in warm soil (70-75°F). Start them indoors 8-10 weeks before your last frost date using a seed-starting mix. Plant them ½ inch deep in small pots and keep them moist but not soggy. You should see sprouts in 2-4 weeks if conditions are right.
Transplant seedlings outdoors only after all danger of frost has passed and soil temperatures are consistently above 60°F. Harden them off for 1-2 weeks before moving them to their permanent location. This gradual transition helps prevent shock and ensures strong, healthy plants.
Tips & tricks for perfect canna seed pod harvesting
These simple tricks will help you avoid the frustrating twist-and-snap mess that ruins so many canna seed collections.
Timing Secret: Harvest your canna seed pods when they're fully green but just starting to show brown edges at the base. This is their peak firmness—any later, and they'll twist open on their own. I learned this the hard way after losing three batches to overripe pods that snapped apart when touched.
Equipment Matters: Never use scissors for harvesting—pruning shears are a must. Scissors crush the delicate pods, making them unusable. I also recommend wearing gloves because ripe pods can be sticky, and the sap sometimes stains. Keep a small bowl nearby to collect pods immediately after cutting to prevent curious animals from snatching them.
Ripening Strategy: After cutting the stalks, let the pods ripen indoors for 3-5 days before opening them. This controlled environment prevents premature twisting while ensuring full maturity. Place them on a clean towel in a well-ventilated area—just enough airflow to keep them dry without creating drafts that could cause them to twist.
Pro Tips for Canna Seed Pods
- These simple tricks will help you avoid the frustrating twist-and-snap mess that ruins so many canna seed collections.
- Timing Secret: Harvest your canna seed pods when they're fully green but just starting to show brown edges at the bas...
- Equipment Matters: Never use scissors for harvesting—pruning shears are a must. Scissors crush the delicate pods, mak...
Frequently asked questions
Got questions about canna seed pods? You’re not alone! Here are some common concerns—and quick answers—to help you master the harvest and avoid those frustrating twists and wasted pods.
What’s the best time to harvest canna seed pods?
Harvest your seed pods when they’re firm but slightly soft to the touch—usually about 4-6 weeks after flowering. If left too long, they’ll twist and shatter, making seeds hard to collect. Morning harvests work best when pods are dry and easier to handle.
Why do canna seed pods twist before I can harvest them?
Twisting happens when pods over-mature and dry out too quickly. To prevent this, harvest regularly (every 2-3 days) and store them in a cool, dry place (like a paper bag). If you miss the window, gently twist the pod by hand—seeds may still be salvageable inside!
Can I save seeds from canna plants grown from store-bought tubers?
Yes! Store-bought tubers can produce seed pods, but results vary. For consistent traits, save seeds from open-pollinated or heirloom varieties. If your pods twist before seeds ripen, try hand-pollinating flowers with a small brush to encourage pod development.
What can I do with canna seed pods if they twist before harvest?
Don’t toss them! Split open twisted pods with a clean knife—you’ll often find viable seeds inside. For extra insurance, plant a few tubers alongside in case some seeds fail to germinate. Twisted pods can also be composted or used as natural mulch.
How should I store canna seeds after harvesting?
Let seeds dry completely (7-10 days) in a well-ventilated area, then store them in a paper envelope or breathable container in a cool, dark place (like a fridge). Label with the harvest date—most canna seeds stay viable for 2-3 years if stored properly!
Wrapping up and next steps
Harvesting canna seed pods doesn’t have to be a frustrating puzzle—with the right timing and techniques, you can avoid twisting, waste, and even maximize future growth! 🌱 By using sharp tools, proper drying methods, and a little patience, you’ll turn those tricky pods into valuable seeds for next season’s garden. Now’s your chance to shine!
Ready to level up your lawn and garden game? Start by gathering your supplies and practicing these tricks—your future canna plants will thank you! Try harvesting a few pods today and watch the difference!