
Lawn
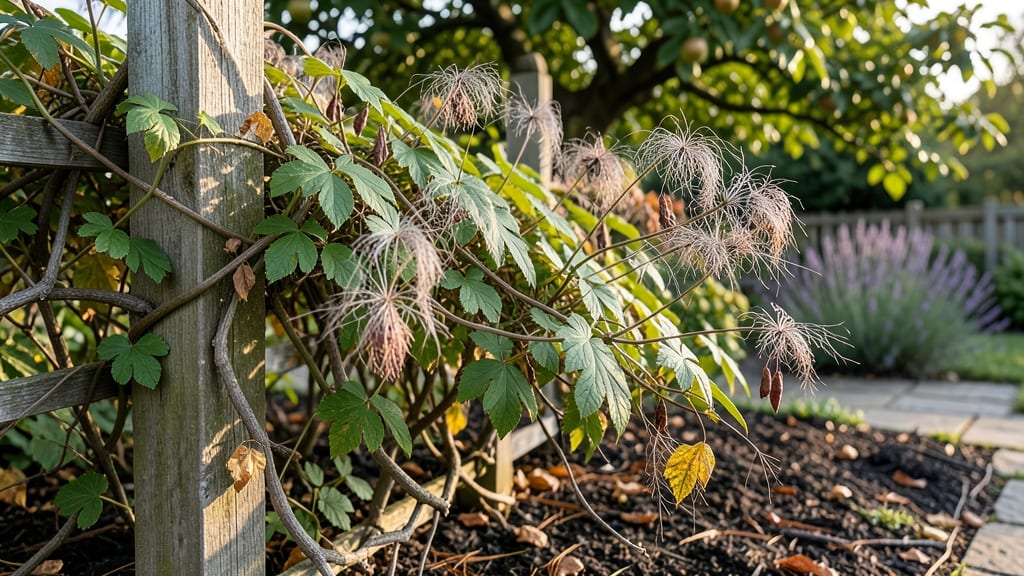
Clematis seed heads hold more potential than you might think—turning them into viable seeds requires just a few simple steps. 🌱 I’ve saved seeds from my own plants for years, and the key is timing: harvest when the seed pods turn brown but before they split open.
This method preserves genetic diversity while keeping your garden thriving.
The process starts with a sharp pair of scissors or pruners—no twisting needed. Cut the seed heads cleanly, then lay them on a tray to dry indoors for about 2 weeks.
Once fully dried, gently rub the pods between your fingers to release the seeds. Store them in an envelope labeled with the variety and harvest date for next year’s planting.
Leaving seed heads on the plant adds winter interest and attracts birds, but if you’re saving seeds, harvesting them early prevents natural dispersal. The result? A steady supply of fresh clematis plants tailored to your garden’s conditions. Plus, you’ll avoid the frustration of unknown varieties popping up unexpectedly.
For best results, harvest seed heads in late fall before the first hard frost. This timing ensures seeds are mature but still viable for spring planting. Whether you’re a beginner or a seasoned gardener, this method makes seed saving simple and rewarding.
📚 In This Guide
- What you need
- Instructions
- Tips and common mistakes
- Wrapping up and next steps
What you need
- ● Mature clematis seed heads: Choose fully dried, brown seed pods from healthy plants (collect at least 10-15 pods for a good yield).
- ● Pruning shears or sharp scissors: For cleanly snipping seed heads from vines.
- ● Paper bags or breathable mesh bags: 2-3 medium-sized bags (10x12 inches) to store seed heads while drying.
- ● Brown paper or newspaper: For lining a tray or flat surface if drying indoors.
- ● Small wooden skewers or toothpicks: 10-12 pieces (for propping open stubborn seed pods).
- ● Fine mesh sieve or sifter: To separate seeds from chaff (a 6-8 inch diameter sieve works well).
- ○ Air-tight seed envelopes or small jars: 3-5 containers with silica gel packets (optional but recommended for long-term storage).
- ● Permanent marker and labels: To mark seed varieties and harvest dates.
- ● Rubbing alcohol (70% isopropyl) and cotton swabs: For sterilizing tools between uses (prevents mold/mildew).
- ● Desiccant packets: For extra-dry storage environments (place 1-2 in seed jars).
- ● Magnifying glass: To inspect seeds for pests or damage before storage.
- ● Spray bottle with water: For lightly misting stubborn seed pods if they’re too dry.
- ● Seed catalog or notebook: To track germination rates and plant traits over time.
- ● Humidity monitor: If storing seeds long-term (ideal range: 30-40% humidity).
Step-by-step guide to harvesting and saving clematis seed heads
Here’s how to collect, dry, and store clematis seed heads the easy way—no fuss, no waste.
🌿 Step 1: Identify and Select Mature Seed Heads
Wait until the seed heads turn a rich, papery brown and the fluffy seed tufts (pappus) are fully visible. These are the ones ready for harvesting. I like to pick on a dry, sunny afternoon when the air is still—this prevents moisture from sticking to the seeds and speeds up drying.
Gently grasp the seed head between your thumb and forefinger, avoiding the delicate stems. A mature head will release easily when lightly tugged. If it resists, it’s not ready yet. You’ll know you’ve picked the right ones when the fluffy bits brush off effortlessly when you run your fingers over them.
🪴 Step 2: Harvest and Prepare for Drying
Place the harvested seed heads in a single layer on a clean, dry surface—like a baking sheet lined with parchment paper. Space them out so air can circulate freely. I use a mesh produce bag or a cardboard box with holes poked in the sides to keep them contained while still allowing airflow.
Find a warm, dry spot with indirect sunlight. A sunny windowsill works well, but avoid direct sun, which can overheat and damage the seeds. If your home is humid, consider placing a small fan nearby to gently circulate air and speed up the drying process.
⏰ Step 3: Dry Thoroughly for Long-Term Storage
Let the seed heads dry for 10-14 days, flipping them occasionally to ensure even drying. You’ll know they’re ready when the fluffy pappus crumbles easily between your fingers and the seed heads feel light and brittle. If any moisture remains, the seeds may spoil during storage.
Once fully dry, gently separate the seeds from the dried heads. I like to do this by rubbing the heads between my palms or tapping them lightly over a bowl. Store the seeds in a paper envelope or small glass jar in a cool, dark place. Label the container with the clematis variety and the harvest date—this helps track freshness.
💧 Step 4: Store Seeds for Year-Round Viability
Clematis seeds can remain viable for 1-2 years if stored properly. Keep them in a dry, cool environment—a pantry or seed vault works best. I avoid plastic bags, as they trap moisture and can lead to mold. Instead, I use breathable paper envelopes or airtight glass jars with a desiccant packet.
Check the seeds periodically for signs of moisture or pests. If you notice any dampness or mold, transfer them to a new container immediately. Properly stored seeds should look dry and crisp, with no signs of discoloration or softness.
Tips & tricks for perfect clematis seed head preservation
These easy strategies will help you maximize seed viability and avoid common pitfalls while working with delicate clematis seed heads.
Timing Secret: Harvest on a dry afternoon when the air is still—this prevents moisture from sticking to the seeds and speeds up drying. I've found that picking after 2 PM works best in my climate, as morning dew can leave unwanted moisture on the seed heads. If you must harvest in damp conditions, gently shake off excess water before drying.
Drying Strategy: During the 10-14 day drying period, I recommend placing a small mesh screen over the seed heads if you have curious pets or children. This keeps them contained while still allowing airflow. The key is to flip them every 2-3 days to prevent uneven drying. If you notice any seed heads drying faster than others, separate them immediately to avoid over-drying.
Storage Wisdom: For long-term storage, I've found that glass jars with tight-sealing lids work better than paper envelopes for humidity control. Place a small silica gel packet inside the jar to absorb any residual moisture. Label each container with both the clematis variety and the harvest date—this helps you track freshness and germination rates over time.
Pro Tips for Clematis Seed Heads
- These easy strategies will help you maximize seed viability and avoid common pitfalls while working with delicate cle...
- Timing Secret: Harvest on a dry afternoon when the air is still—this prevents moisture from sticking to the seeds and...
- Drying Strategy: During the 10-14 day drying period, I recommend placing a small mesh screen over the seed heads if y...
Frequently asked questions
Got questions about harvesting and saving clematis seed heads?
You’re not alone! Here are some of the most common queries—plus quick, actionable answers to keep your seeds viable and your garden thriving.
When is the best time to harvest clematis seed heads?
The ideal time is late summer to early fall (August–October), once the seed heads turn brown and papery but before they split open or scatter seeds naturally. Harvest when humidity is low to prevent mold—morning is perfect!
Can I save clematis seeds from store-bought flowers?
Yes, but with a caveat! Store-bought clematis seeds may not produce identical plants due to hybrid breeding. For true-to-type results, source seeds from open-pollinated varieties or your own garden. Pro tip: Label seeds by cultivar to track varieties!
How do I store clematis seeds for long-term viability?
After harvesting, let seed heads dry completely (1–2 weeks in a cool, dark, well-ventilated spot). Then, store them in a paper envelope (not plastic!) in the fridge (35–40°F) for up to 1 year. Add a moisture absorber (like silica gel) to prevent rot.
Why are my clematis seed heads attracting pests?
Seed heads can draw spider mites, aphids, or even rodents if left too long on the plant. To deter pests:
- Harvest promptly (don’t wait past fall).
- Shake off debris before storage.
- Freeze seed heads for 24 hours to kill hidden pests before drying.
What if my clematis seeds don’t germinate?
Low germination rates often stem from immature seeds or improper storage. Try these fixes:
- Stratify seeds: Mix with damp sand, refrigerate for 4–6 weeks, then sow.
- Check moisture: Seeds need consistent dampness (not soggy) to sprout.
- Test viability: Float seeds in water—sinkers are viable; floaters are likely dead.
Wrapping up and next steps
Clematis seed heads are a gardener’s hidden treasure—packed with potential for next year’s blooms and easy to preserve with the right techniques! By mastering zero-twist harvesting, you’ll ensure viable seeds while keeping your garden thriving year-round.
Whether you’re a seasoned pro or just starting, this method simplifies the process and adds a touch of sustainability to your green space.
Ready to level up your gardening game? 🌱 Grab those seed heads, follow the steps, and watch your clematis flourish for seasons to come. Next up: Experiment with different varieties and share your successes—your garden (and future blooms) will thank you!