
Lawn
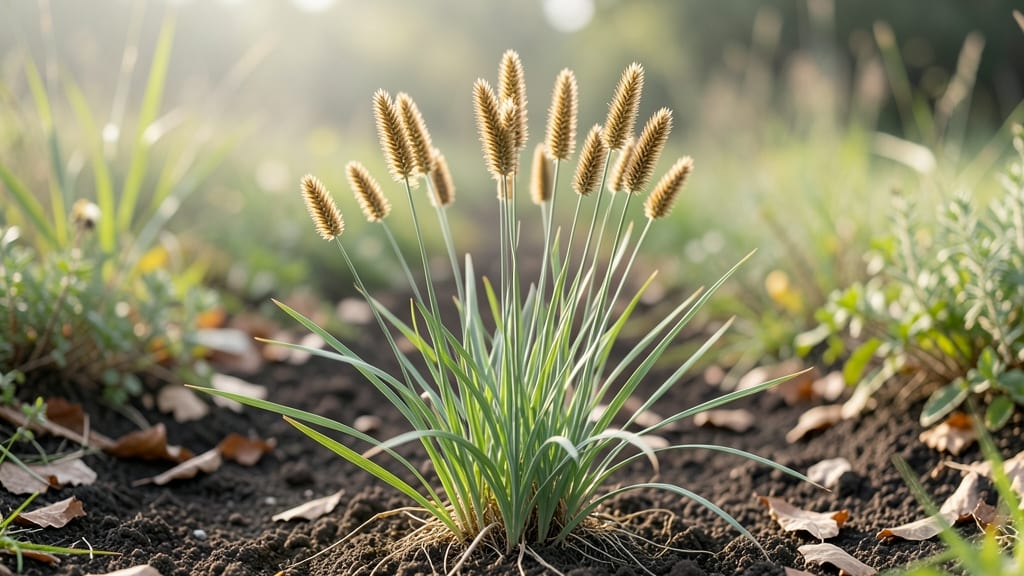
Those spiky seed pods swaying in winter wind are ornamental grasses at their most dramatic. 🌿 I fell for them after seeing Pennisetum alopecuroides—its bottlebrush plumes standing tall even after frost. These grasses thrive when planted in late summer, letting cold stress trigger germination for stronger roots before winter.
The secret lies in well-draining soil and full sun (6+ hours daily). Space plants 18-24 inches apart to let their seed heads dance without crowding. Varieties like Stipa tenuissima (feather reed grass) add airy texture, while Pennisetum delivers bold structure—both perfect for borders, containers, or cutting gardens.
Once established, they’re nearly maintenance-free. Water deeply once a week in summer, prune back in early spring, and protect young plants from harsh winters with a light mulch. The reward? Year-round interest with minimal effort. Design tip: Pair with late-blooming perennials like coneflowers or ornamental kale.
Their seed pods catch light beautifully in winter, creating focal points when most gardens fade.
📚 In This Guide
- What you need
- Instructions
- Tips and common mistakes
- Wrapping up and next steps
What you need
- ● Seed: 1–2 lbs of cold-hardy ornamental grass seeds (e.g., Stipa tenuissima, Elymus aristatus, or Panicum virgatum ‘Northwind’). Choose organic, untreated seeds for best results.
- ● Germination Trays: 2–4 shallow trays (10"x20" or larger) with drainage holes (plastic or biodegradable options work).
- ● Potting Mix: 5–10 gallons of well-draining, sterile mix (50% peat moss or coco coir, 30% perlite, 20% sand). Avoid garden soil—it’s too dense!
- ● Cold Frame or Refrigerator: A clear plastic propagator (for cold frames) OR a cool, dark space (like a fridge set to 35–40°F) for stratification.
- ● Misting Bottle: 1 with a fine spray nozzle to keep seeds moist without drowning them.
- ● Plastic Wrap or Humidity Dome: 1 roll to retain moisture during early germination.
- ● Hand Trowel: 1 for gently pressing seeds into the mix.
- ● pH Test Kit: 1 to check soil pH (ideal range: 6.0–7.0 for most ornamental grasses).
- ○ Grow Lights (Optional): 1–2 LED bulbs (6,500K) if starting indoors with limited sunlight.
- ○ Seedling Heat Mat (Optional): 1 (70–75°F) to speed up germination after cold treatment.
- ● Garden Gloves: 1 pair to protect hands from sharp seed pods (trust us, they’re not fun to handle!).
How to grow grass with spiky seed pods using cold-stressed germination
Cold-stressed germination unlocks the potential of these ornamental grasses—here's how to coax reliable blooms from tricky seed pods.
🌱 Step 1: Collect and Prepare the Seed Pods
Harvest seed pods when they're fully mature but still attached to the plant—this ensures maximum viability. I look for pods that have turned a deep, dry brown and feel crisp to the touch. Gently twist them off the stems and store them in a paper bag for 2-3 weeks in a cool, dry place. This mimics natural winter conditions and breaks seed dormancy.
Before sowing, give the pods a light rub between your fingers to release the seeds. Don't crush them—just enough to loosen the seeds inside. If you're working with particularly tough pods, like those from Pennisetum or Stipa, soak them in warm water for 12 hours first. This softens the outer casing and improves germination rates.
💧 Step 2: Cold-Stress the Seeds for Better Germination
Fill a shallow tray with dampened vermiculite or perlite—these materials hold moisture without compacting. Spread the seeds evenly across the surface, ensuring they don’t overlap. Place the tray in a sealed plastic bag and refrigerate for 4-6 weeks. This cold stratification mimics winter conditions and tricks the seeds into thinking it’s time to grow.
Check the tray every 7-10 days to ensure the medium stays moist but not soggy. If you see condensation on the bag, open it slightly to let excess moisture escape. The goal is to keep the seeds consistently cool and damp without letting them rot. After 4 weeks, transfer the tray to a warmer spot for 1-2 weeks to simulate spring. You’ll see the first signs of germination within 7-14 days after this transition.
☀️ Step 3: Sow the Germinated Seeds in Well-Draining Soil
Fill small seedling trays or individual pots with a mix of 50% potting soil and 50% perlite or sand. This ensures excellent drainage—critical for grasses, which rot easily in waterlogged soil. Moisten the mix lightly before sowing, but avoid oversaturating it. Scatter the germinated seeds on the surface, pressing them in just enough to make contact with the soil without burying them.
Place the trays in a warm, bright spot with indirect light for the first 2 weeks. Avoid direct sunlight, which can scorch the delicate seedlings. Keep the soil consistently moist by misting it lightly every 2-3 days. You’ll know you’re on the right track when the first true leaves appear—these will be long, slender, and grass-like, unlike the initial seed leaves.
✂️ Step 4: Transplant and Maintain for Healthy Growth
Once seedlings reach 3-4 inches tall and have developed 3-4 true leaves, it’s time to transplant them into individual pots or directly into the garden. Choose a location with full sun to partial shade, depending on the specific grass variety. Most ornamental grasses thrive in 6+ hours of sunlight daily, but a few, like Carex, tolerate shade better.
Water deeply after transplanting to help the roots establish, then reduce watering to once a week once the plants are settled. Let the top 1-2 inches of soil dry out between waterings—overwatering is the fastest way to kill these grasses. Fertilize lightly with a balanced, slow-release fertilizer in early spring to encourage lush growth. Avoid heavy feeding, as it can lead to weak stems and fewer seed pods.
⏰ Step 5: Encourage Blooms and Prepare for Next Season
By the second year, your grasses should start producing those signature spiky seed pods. To promote blooming, deadhead spent flower stalks in late fall or early winter, but leave some pods on the plant if you want to collect seeds for next season. Most ornamental grasses are perennial, so they’ll return year after year with minimal care.
In late fall, cut back the foliage to 2-3 inches above the ground to encourage new growth in spring. This also prevents the plant from becoming top-heavy and flopping over in winter. If you’re in a colder climate, mulch around the base with 2-3 inches of straw or shredded leaves to protect the roots from freezing temperatures. With this method, you’ll have reliable blooms and those coveted spiky seed pods season after season.
Tips & tricks for perfect grass with spiky seed pods
Cold-stressed germination might sound complicated, but these practical tips will help you avoid common pitfalls and maximize your success with ornamental grasses.
Pod Selection Matters: The 2-3 week drying period in Step 1 is crucial—don't rush it! Look for pods that are completely dry and crisp to the touch, not just slightly brown. If you harvest too early, the seeds won't break dormancy properly. For particularly stubborn pods like Pennisetum, that 12-hour warm water soak can make all the difference in releasing seeds without damaging them.
Cold-Stressing Precision: During the 4-6 week refrigeration period in Step 2, consistency is key. Use a thermometer to confirm your fridge stays between 35-40°F—the ideal range for stratification. I've seen germination rates drop significantly when seeds experience temperature fluctuations. The 7-10 day moisture checks are non-negotiable; condensation buildup can create anaerobic conditions that kill seeds.
Soil Mix Secrets: The 50% potting soil to 50% perlite/sand ratio in Step 3 creates the perfect balance. Too much soil compacts and holds moisture, while too much perlite drains too quickly. I recommend mixing in a handful of compost (about 10% of the total volume) to provide gentle nutrients without overwhelming the delicate seedlings. This small addition can boost early growth without requiring additional fertilizer.
Transplanting Timing: Waiting until seedlings reach 3-4 inches with 3-4 true leaves in Step 4 ensures they have strong enough root systems to handle transplant shock. I've learned this the hard way—rushing the transplant can lead to stunted growth or even death. When transplanting, dig holes twice as wide as the root ball to encourage root spread into the surrounding soil.
Pro Tips for Grass With Spiky Seed Pods
- Cold-stressed germination might sound complicated, but these practical tips will help you avoid common pitfalls and m...
- Pod Selection Matters: The 2-3 week drying period in Step 1 is crucial—don't rush it! Look for pods that are complete...
- Cold-Stressing Precision: During the 4-6 week refrigeration period in Step 2, consistency is key. Use a thermometer t...
Frequently asked questions
Got questions about those grass with spiky seed pods and how to handle them? You’re not alone! Here are some of the most common queries—plus quick, actionable answers to keep your lawn thriving.
Why does my grass have spiky seed pods, and is it harmful?
Those spiky seed pods are actually flower heads from grasses like Poa annua or crabgrass. They’re not harmful to your lawn but can look unsightly. The pods release seeds to spread, which may mean more weeds if left unchecked. Pull or rake them out before they mature!
When should I remove the spiky seed pods from my lawn?
Remove them as soon as you notice them—ideally before they turn brown or release seeds. Early removal (spring to early summer) prevents new weeds from sprouting. If you wait until fall, you’ll likely see a surge in unwanted grass next year. A quick rake or hand-pulling works best!
Can I still overseed my lawn if there are spiky seed pods present?
Yes, but first remove the pods! Overseeding works best on bare soil. Mow low, rake out debris (including pods), and aerate if needed. Then, apply your new seed mix. Pro tip: Water lightly for 10–14 days to help germination while keeping existing weeds at bay.
What’s the best way to prevent grass with spiky seed pods from returning?
Prevention starts with healthy turf and proactive care:
- Mow high (3–4 inches) to shade out weeds.
- Fertilize regularly (use a slow-release, weed-preventing formula).
- Water deeply but infrequently (1–1.5 inches per week) to discourage weed seeds.
- Apply pre-emergent herbicide in early spring (follow label instructions).
Are spiky seed pods a sign of disease or poor soil?
Not necessarily! While some grasses (like Poa annua) naturally produce seed pods, excessive pods + thin patches could signal disease (e.g., brown patch) or compacted soil. Test your soil’s pH and nutrients—aim for 6.0–7.0 pH and balanced N-P-K. If issues persist, consult a local lawn care pro.
Wrapping up and next steps
From cold-stressed germination to vibrant blooms, mastering the art of growing grasses with spiky seed pods unlocks a world of low-maintenance, drought-tolerant beauty for your lawn. Whether you’re reviving neglected patches or prepping for next season, this method delivers reliable results—no green thumb required! 🌱✨
Ready to transform your outdoor space? Grab your supplies, follow the steps, and watch your yard thrive. Start small, experiment, and enjoy the process!
- 📅 Next step: Test a small patch this fall and track progress.
- 🌿 Pro tip: Share your results with fellow gardeners—community tips make all the difference!