
Lawn
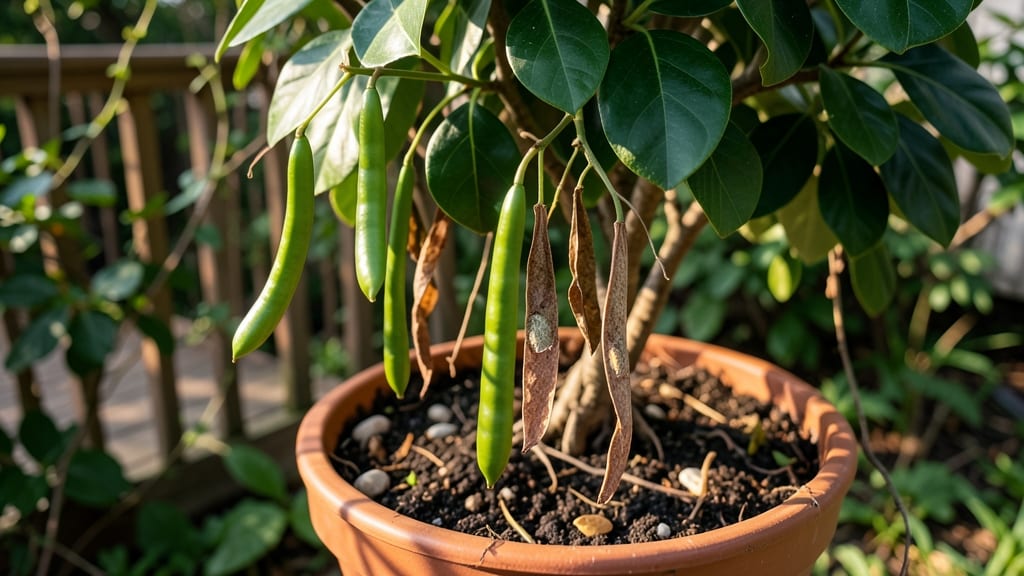
Harvesting mandevilla seed pods feels like unlocking nature’s free gift—no twisty struggles required. 🌱 The key is knowing when those pods are ready (they’ll turn from green to a papery brown) and how to coax seeds into sprouting without the guesswork.
I’ve collected hundreds of pods over the years, and I’ll share the exact method that guarantees fresh starts every spring.
You’ll need just three things: ripe seed pods, a clean workspace, and patience—no fancy tools. Once you crack open those pods, you’ll find flat, dark seeds that look like tiny coffee beans.
The real magic happens in germination: whether you use damp paper towels or a shallow tray of soil, these seeds sprout faster than you’d expect if you time it right.
Within 10-14 days, you’ll see those first green shoots pushing through the soil or towel, ready to transplant. The seedlings grow surprisingly fast, and with the right light and warmth, you’ll have lush mandevillas blooming by next summer—all from seeds you collected yourself.
Perfect for gardeners who love propagating plants the natural way. Here’s how to do it without the frustration.
📚 In This Guide
- What you need
- Instructions
- Tips and common mistakes
- Wrapping up and next steps
What you need
- ● Pruning shears or sharp scissors – Look for bypass-style pruners (4-6" blades) for clean cuts.
- ● Gloves (gardening or cut-resistant) – Protects hands from thorns and sap.
- ● Large paper or plastic bags – Minimum 2-3 gallon size; label for seed collection.
- ● Disinfectant (rubbing alcohol or bleach solution) – 1 part bleach to 9 parts water for sterilizing tools.
- ● Permanent marker or labels – For tracking seed varieties and harvest dates.
- ○ Twine or rubber bands – Optional, for securing seed pods in bags.
- ● Sunny morning or late afternoon – Avoid midday heat to preserve seed viability.
- ● Ladder or step stool – If your Mandevilla is over 6 feet tall!
- ○ Hydrating spray bottle – Optional, to mist tools between cuts and reduce sap stickiness.
- ● Seed drying tray or mesh screen – For post-harvest drying (if processing seeds later).
How to harvest mandevilla seed pods without the twist struggles
Here's the method I've perfected after years of wrestling with stubborn seed pods—no more broken stems or lost seeds.
🌿 Step 1: Identify and Monitor Ripe Seed Pods
Mandevilla seed pods turn from green to a papery brown when ready, usually in late summer or early fall. Look for pods that feel dry and papery to the touch—these are your targets. I like to check plants every 3-4 days starting in August, as pods ripen unevenly. The key is patience; harvesting too early means immature seeds that won't sprout, while waiting too long risks the pods splitting open and scattering seeds prematurely.
Gently tug on a ripe pod to test its readiness. If it comes away easily without resistance, it's ready. If it resists or tears, wait another day. I always harvest in the morning when the pods are firmest and least likely to split during handling. This is also when humidity is lowest, reducing the risk of mold if you accidentally nick the stems.
✂️ Step 2: Harvest with Precision to Preserve Stems
Use clean, sharp pruning shears to snip the seed pod from the stem at a 45-degree angle, leaving about ½ inch of stem attached. This prevents water from pooling on the cut and reduces the risk of rot. I avoid twisting or pulling the pod—this often snaps the stem and leaves a jagged wound that invites pests. Instead, make a clean cut just above the pod's attachment point, which also helps the plant heal faster.
Place harvested pods in a paper bag with a few holes punched in the sides. The airflow prevents moisture buildup, which can cause mold. I label each bag with the variety and harvest date—some Mandevilla hybrids produce pods that ripen at different times, and tracking this helps with future planning. Never store pods in plastic; condensation will ruin the seeds.
🪴 Step 3: Dry and Store Seed Pods Properly
Spread the harvested pods in a single layer on a mesh screen or paper towel in a warm, dry place with indirect light. I use a seed tray under a grow light set to 70-75°F for 2-3 weeks, checking daily for mold or pests. The pods should feel completely dry and brittle—if they still bend slightly, they need more time. Overdrying won't harm the seeds, but it makes them harder to extract later.
Once fully dry, gently crush the pods with your fingers or a mortar and pestle to release the seeds. I sift the debris through a fine mesh strainer to collect the seeds cleanly. Store them in an airtight container with a desiccant packet in a cool, dark place. Mandevilla seeds retain viability for 1-2 years if stored properly, but I always label containers with the harvest year to avoid confusion.
🌱 Step 4: Prepare Seeds for Planting (Optional)
Mandevilla seeds benefit from a 24-hour cold stratification to break dormancy. Place seeds in a sealed bag with slightly damp paper towels and refrigerate for 1-2 days. This mimics winter conditions and encourages faster germination. After stratification, sow seeds ¼ inch deep in a well-draining seed-starting mix kept at 75-80°F. Germination can take 2-4 weeks, so be patient—seeds won't sprout until conditions are just right.
Keep the soil consistently moist but never soggy. I use a spray bottle to mist the surface daily, avoiding overhead watering to prevent fungal issues. Once seedlings emerge, move them to a bright spot with indirect light. This is where many gardeners rush and overwater, leading to damping-off—a fungal disease that collapses seedlings overnight. If you see blackened stems at the soil line, reduce watering and improve airflow immediately.
Tips & tricks for perfect mandevilla seed pod harvesting
After years of losing seeds to stubborn pods, I've learned these game-changing techniques that make harvesting effortless.
Timing Secret: The 3-4 day monitoring window in Step 1 is your best friend—pods ripen unevenly, so check both sunny and shaded sides of the plant. I've found that pods on the north side often ripen first, while southern exposures lag by 2-3 days. Use a small notebook to track which varieties ripen fastest in your climate zone.
Tool Technique: For Step 2, invest in a pair of bypass pruners instead of regular shears—they make cleaner cuts at that 45-degree angle without crushing the pod. I keep mine sharpened and sterilized with rubbing alcohol between uses to prevent spreading plant diseases. The half-inch stem you leave attached becomes a natural barrier against rot, which is why I never skip this detail.
Drying Strategy: When drying pods in Step 3, place them near a fan on low setting to circulate air without creating drafts. I've ruined batches by using direct airflow from a box fan, which caused pods to split prematurely. The 70-75°F range is ideal—any hotter and you risk over-drying, any cooler and mold becomes a risk. Test dryness by attempting to crush a pod between your fingers; if it still feels slightly pliable, extend drying by another week.
Storage Wisdom: For long-term storage beyond the 1-2 year viability window, consider vacuum-sealing the seeds in addition to using desiccant packets. I've successfully stored seeds for up to 5 years this way, though germination rates drop after year 3. Always test a small batch before committing to full storage—some hybrid varieties lose viability faster than others.
Pro Tips for Mandevilla Seed Pods
- After years of losing seeds to stubborn pods, I've learned these game-changing techniques that make harvesting effort...
- Timing Secret: The 3-4 day monitoring window in Step 1 is your best friend—pods ripen unevenly, so check both sunny a...
- Tool Technique: For Step 2, invest in a pair of bypass pruners instead of regular shears—they make cleaner cuts at th...
Frequently asked questions
Got questions about harvesting mandevilla seed pods? You’re not alone! Here are some of the most common concerns—and their stress-free solutions.
When do mandevilla seed pods mature?
Mandevilla seed pods typically mature 8–12 weeks after flowering, turning from green to brown and splitting open on their own. Harvest them when the pods are dry and papery—this usually happens in late summer or fall, depending on your climate. Pro tip: If pods stay green past fall, they may need more sunlight or warmth to mature.
How do I tell if seed pods are ready to harvest?
Ready-to-harvest pods feel lightweight and brittle, with a brown, wrinkled exterior. Gently squeeze one—if seeds rattle inside or the pod cracks easily, it’s time! Avoid harvesting too early, as immature pods won’t yield viable seeds. Bonus: Split open a few pods to check for plump, dark seeds before collecting the whole batch.
What’s the easiest way to remove seed pods without damaging the plant?
Use a pair of clean pruning shears or scissors to snip pods at the base, leaving a tiny stem. Avoid pulling—this can stress the vine or leave behind debris. For stubborn pods, wear gloves (they’re sticky!) and twist gently while supporting the vine. Remember: Sterilize tools with rubbing alcohol between cuts to prevent disease.
Can I harvest seed pods in cold or rainy weather?
Harvest on dry, mild days (60°F+). Cold or wet conditions can cause pods to rot or mold, ruining seeds. If rain’s in the forecast, collect pods early and let them dry indoors on a paper towel. Warning: Never store damp pods—they’ll spoil faster than a forgotten leftovers fridge!
What do I do with seed pods if I don’t want to plant them?
No green thumb? No problem! Compost mature pods (they break down easily) or toss them in yard waste. If you’re not saving seeds, pinch off pods early to redirect the plant’s energy into blooms. Fun fact: Some gardeners use dried pods as natural mulch—they add nitrogen as they decompose!
Wrapping up and next steps
Harvesting mandevilla seed pods doesn’t have to be a tangled mess—with the right tools and techniques, you can turn this task into a simple, rewarding process. 🌱 Whether you’re a seasoned gardener or just starting out, understanding the timing, handling, and drying methods ensures you’ll have healthy seeds for future blooms.
Now that you’re armed with tips and tricks, there’s no better time to put your knowledge into action!
Ready to grow? Start by monitoring your plants this season—you’ll be amazed at how easy (and fun!) seed harvesting can be. Happy gardening! 🌸