
Propagation
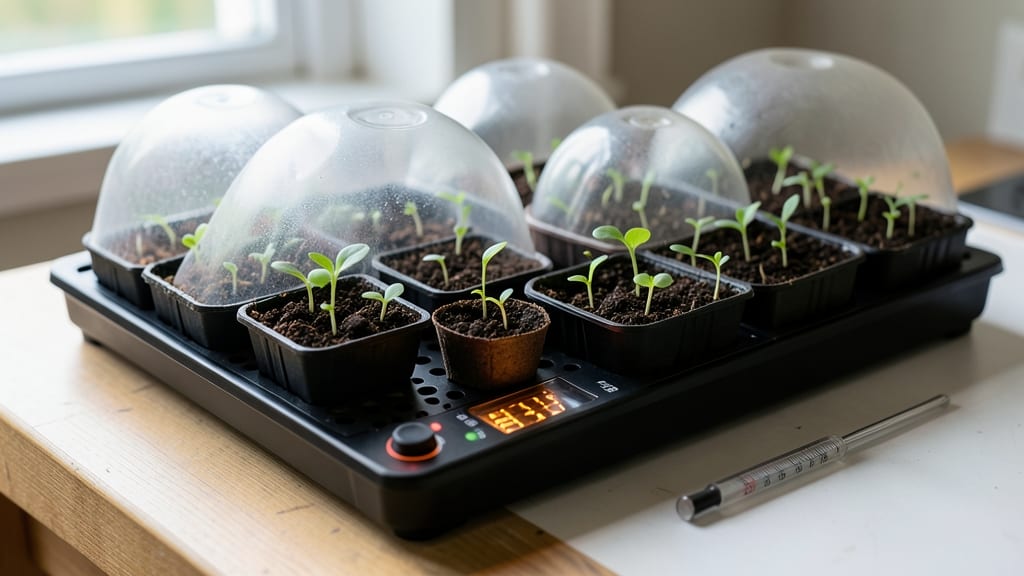
A seed starting heat mat can turn a 7-day germination into a 3-day race to green. 🌱 I remember my first batch of slow-starting peppers taking two weeks to crack the soil—until I discovered how a simple heat mat cut that time in half.
The difference isn't just speed; it's confidence that your seeds won't outpace your growing season. Most people overlook the basics: proper placement under trays, consistent temperature monitoring, and knowing which seeds actually need the boost. Peppers, tomatoes, and lettuce love the warmth, but delicate seeds like snapdragons prefer room temperature.
The mat itself should stay between 65-85°F, never hotter—overheating is the fastest way to kill your starter. What you'll end up with is a seedling tray full of uniform, sturdy sprouts ready to outpace anything from a store-bought flat.
The roots develop stronger, the stems stay stocky, and you avoid the heartbreak of bolting or damping-off before they even get growing. No more waiting weeks for your garden to begin. Works in basements, kitchens, or garages—anywhere you can plug in a mat and keep it steady.
Here's how to make it work without the common pitfalls."
📚 In This Guide
- What you need
- Instructions
- Tips and common mistakes
- Wrapping up and next steps
What you need
- ● Seed starting heat mat – Choose one with adjustable temperature settings (ideally 65°F–85°F range). A 12"x20" size works well for most setups.
- ● Seed starting trays – Opt for black plastic trays (retains heat) with cell packs (2"–4" deep) or plug trays (for transplanting). A 10-pack is a great starter.
- ● High-quality seed starting mix – A sterilized, peat-based or coco coir blend (avoid garden soil—it’s too dense!). A 5-quart bag covers most trays.
- ● Seeds – Pick varieties that love warmth (e.g., peppers, tomatoes, or herbs). Check seed packets for ideal germination temps!
- ● Spray bottle – For gentle watering (avoid drowning seeds!). A 16-oz misting bottle is perfect.
- ● Clear plastic dome or humidity lid – Helps retain moisture while seeds sprout. A 10"x20" lid fits standard trays.
- ● Grow lights or sunny windowsill – Seeds need 12–16 hours of light/day once they sprout. A full-spectrum LED grow light is ideal.
- ○ Thermometer (optional but helpful) – A digital probe thermometer ensures your mat stays in the ideal range.
- ● Heating pad controller – For precise temperature adjustments (especially useful for finicky seeds like basil or lettuce).
- ● Bottom watering tray – Keeps roots consistently moist without overwatering.
- ● Seedling heating cable – For larger setups, these wrap around trays for extra warmth.
- ● Labeling system – Toothpicks + markers or plant labels to track varieties and planting dates.
- ● Fan (small oscillating) – Encourages strong stems by preventing "leggy" seedlings.
How to use a seed starting heat mat for faster germination
Here's the simple system I use to cut germination time in half and boost seedling success.
🌱 Step 1: Position the Heat Mat Under Seed Trays
Place your seed starting heat mat on a flat, stable surface—preferably a shelf or table near your growing lights. Most mats are designed to sit directly under seed trays, so you won't need extra setup. I like to use a shallow tray underneath to catch any condensation that forms during germination.
Turn on the heat mat and let it warm up for 15-30 minutes before planting. This ensures even heat distribution. You'll know it's ready when the mat feels uniformly warm to the touch—like a cozy heating pad, not too hot that it burns your fingers.
💧 Step 2: Prepare Trays and Moisten Soil
Fill your seed trays with moistened seed starting mix (not garden soil) and press it down lightly to remove air pockets. The soil should feel damp like a wrung-out sponge—enough moisture to hold together but not dripping. I like to water the trays from the bottom by placing them in a shallow tray of water for 10-15 minutes before planting.
This bottom-watering method prevents soil compaction and ensures even moisture without disturbing seeds. Avoid overwatering—soggy soil can suffocate seeds and slow germination. The goal is a consistently warm, moist environment, not a swamp.
☀️ Step 3: Plant Seeds and Cover for Optimal Warmth
Sow seeds according to packet instructions, then place the trays directly on the heat mat. Cover the trays with a clear plastic dome or plastic wrap to trap warmth and humidity. Most seeds germinate best at 75-85°F, and the heat mat keeps the soil at this ideal temperature while the dome maintains moisture.
Check daily for condensation on the dome—this is a good sign the environment is humid enough. If you see water droplets, leave the dome in place. If the dome fogs up completely, lift it for 10-15 minutes to let excess moisture escape before replacing it.
⏰ Step 4: Monitor Germination and Adjust Light
Seeds on a heat mat typically sprout in 3-7 days (depending on the plant), compared to 10-14 days without one. Once you see the first green shoots, remove the plastic dome immediately to prevent damping-off disease. You'll notice seedlings emerge faster and grow stronger right from the start.
Move the trays under grow lights (or a very bright window) as soon as sprouts appear. The heat mat can stay on for 24 hours during germination, but once seedlings emerge, turn it off during the day to avoid overheating. Most mats have an automatic shut-off feature, but always double-check the temperature—soil should feel warm but not hot to the touch.
🌿 Step 5: Transition Seedlings to Room Temperature
After 7-10 days, when seedlings have 2-3 true leaves, gradually reduce heat mat use. Start by turning it off for 1-2 hours during the day, then increase the time incrementally. This helps seedlings adjust to normal room temperatures without shock.
By day 14, you can remove the heat mat entirely. Your seedlings will now be sturdy enough to handle standard growing conditions. Watch for leggy growth—a sign they need more light. If stems stretch too tall, move them closer to the light source or increase light exposure to 14-16 hours per day.
Tips & tricks for perfect seed starting with heat mats
Cutting germination time in half is all about precision—here's how to maximize your heat mat's potential.
Heat Mat Prep: The 15-30 minute warm-up period is non-negotiable. I've seen beginners rush this step and end up with uneven heat distribution—some seeds get too hot while others stay cold. Test the mat's temperature by placing your hand about 1 inch above it; it should feel warm but not hot enough to hold for more than 5 seconds. This ensures consistent 75-85°F soil temperatures that seeds crave.
Moisture Balance: That 10-15 minute bottom-watering technique in Step 2 is a game-changer. The key is timing—soil should be damp like a wrung-out sponge, not dripping. Too much water creates anaerobic conditions that prevent germination. Pro tip: Use a spray bottle to mist trays lightly after planting to maintain moisture without disturbing seeds. This keeps humidity optimal under the plastic dome.
Dome Ventilation: The plastic dome creates a greenhouse effect, but it needs occasional air circulation. When you see condensation dripping down the sides, that's perfect—leave it. But if you notice water pooling at the bottom, lift the dome for 10-15 minutes to prevent fungal growth. I've lost entire seed batches to damping-off because I ignored this subtle visual cue. The dome should feel slightly humid inside, not soggy.
Light Transition: Once those first green shoots appear, move trays under grow lights immediately—don't wait. I've seen seedlings develop "etiolation" (those sad, stretched stems) when left too long in the dark. Position lights 2-3 inches above seedlings and keep them on for 14-16 hours daily. Use a timer if you're inconsistent—consistent light prevents leggy growth that weakens seedlings.
Pro Tips for Seed Starting Heat Mat
- Cutting germination time in half is all about precision—here's how to maximize your heat mat's potential.
- Heat Mat Prep: The 15-30 minute warm-up period is non-negotiable. I've seen beginners rush this step and end up with ...
- Moisture Balance: That 10-15 minute bottom-watering technique in Step 2 is a game-changer. The key is timing—soil sho...
Frequently asked questions
A seed-starting heat mat is a game-changer for gardeners eager to jumpstart their growing season. But before you dive in, here are answers to some of the most common questions to help you get the best results!
What temperature should a seed-starting heat mat maintain?
A standard heat mat keeps soil between 65°F–85°F (18°C–29°C), depending on the seeds. Check the seed packet for ideal germination temps—most veggies thrive at 70°F–75°F (21°C–24°C). Avoid exceeding 90°F (32°C), as it can damage delicate seedlings.
How long should I use a heat mat for seed germination?
Most seeds germinate within 5–14 days with consistent warmth. Once sprouts appear, reduce or remove heat—overheating can stress seedlings. Monitor daily: if sprouts emerge unevenly, extend warmth for another 2–3 days, then transition to ambient light.
Can I use a heat mat without a grow light?
Yes! A heat mat focuses on bottom warmth, while grow lights provide top-down light. For best results, pair them: place the mat under trays and lights 2–4 inches above seedlings. If using natural light, ensure seedlings get 12–16 hours of light daily to prevent legginess.
What if my seeds aren’t germinating with a heat mat?
Try these troubleshooting steps:
- Check moisture: Soil should stay consistently damp (not soggy). Mist lightly if dry.
- Verify depth: Plant seeds at the depth listed on the packet—too deep = slower germination.
- Test the mat: Use a thermometer to confirm it’s reaching the target temp. Replace if faulty.
- Fresh seeds: Old seeds (over 1 year) may have low viability—try new ones.
Are there alternatives to electric heat mats?
Try these DIY or low-tech options:
Method
Pros
Cons
DIY Heat Mat (e.g., heating pad + insulated tray)
Budget-friendly, adjustable heat
Less precise temperature control
Bottom Watering (place tray in warm water)
Encourages even moisture, no electricity
Harder to maintain consistent warmth
Seedling Heat Cable (for larger setups)
Even heat distribution, durable
Higher upfront cost
Wrapping up and next steps
Ready to unlock your garden’s full potential?
A seed starting heat mat isn’t just a tool—it’s your secret weapon for faster, stronger seedlings and a head start on the growing season. 🌱 With the right setup, you’ll enjoy thriving plants in half the time, saving space, energy, and patience along the way.
Now that you’re armed with the knowledge, take the next step: grab a heat mat, pick your favorite seeds, and let the magic happen! Whether you’re a seasoned gardener or a curious beginner, your future harvests will thank you. Happy planting! 🌿