
Propagation
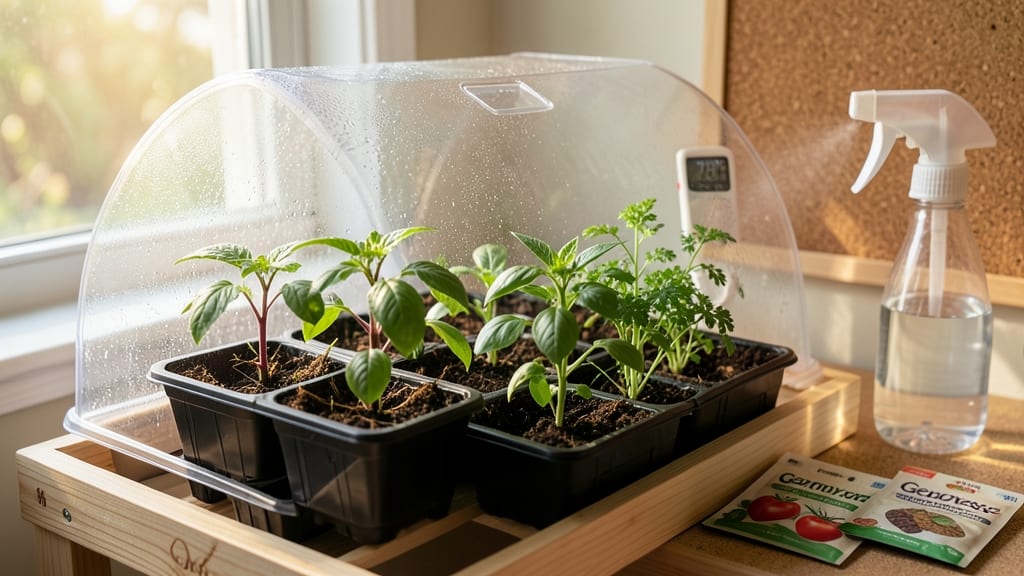
A small seed starting greenhouse turns a cramped corner into a high-output germination station. 🌱 I used mine to start 50 tomato plants last winter—no extra space needed, just smart organization. The right setup keeps seedlings healthy, compact, and ready for transplanting when they're just a few inches tall.
The key is matching your greenhouse to your space and needs. A 2'x2' model fits under kitchen cabinets, while a 3'x3' version handles larger batches. You'll need a heat mat for consistent warmth, a spray bottle for humidity, and a grow light if natural light is weak.
My setup cost under $100 and saved me from buying expensive transplants every spring.
With proper care, your seedlings will grow strong and stocky—not leggy or weak. You'll see true leaves in about 10-14 days, and by 4-6 weeks, they'll be ready to harden off. The greenhouse keeps them protected from drafts, pests, and temperature swings that ruin so many starts.
Works for any seed type—veggies, herbs, or flowers—and adapts to apartments, garages, or even sunny windowsills. Let's get those seeds sprouting efficiently!
📚 In This Guide
- What you need
- Instructions
- Tips and common mistakes
- Wrapping up and next steps
What you need
- ● Greenhouse Structure: 1x Small greenhouse kit (e.g., 2’x4’ or 3’x3’ plastic or polycarbonate)
- ● OR DIY frame (PVC pipes, wood, or metal tubing)
- ● Base: 1x Flat, stable surface (e.g., tray, shallow bin, or pallet)
- ○ Optional: Gravel or pebbles (1–2 lbs) for drainage
- ● Growing Medium: Seed-starting mix (1–2 bags, 1–2 cubic feet each)
- ● Perlite or vermiculite (small bag, ~1 lb) for aeration
- ● Containers: Seed trays (2–4, with or without domes) OR small pots (4–6", 12–24 units)
- ○ Ventilation: 1–2 small fans (optional but helpful for airflow)
- ● Adjustable vents or zippered panels (if not pre-installed)
- ● Lighting: Grow lights (LED or fluorescent, 1–2 bulbs, 12–18" above seedlings)
- ○ Timer (optional, for automated 12–16 hour light cycles)
- ● Miscellaneous: Spray bottle (for watering seedlings)
- ● Labels & markers (for tracking seed varieties)
- ● Trowel or small shovel (for transplanting)
- ● Heating mat (for cold climates, 1–2 mats depending on size)
- ● Humidity dome or plastic wrap (to retain moisture)
- ● Thermometer/hygrometer (to monitor conditions)
- ● Rolling cart or stand (for mobility)
- ● Reflective material (aluminum foil or mylar for extra light bounce)
How to build a space-saving seed starting greenhouse
Here's how to create a compact, high-performance germination station that fits even the smallest kitchen or balcony.
🪴 Step 1: Select and Prepare Your Base Structure
Choose a shallow, rectangular container with a clear lid—think plastic storage bins, old aquariums, or even a repurposed glass cake stand. The key is a low profile (under 6 inches deep) to maximize vertical stacking while keeping humidity stable. I like 12x24-inch bases because they fit under most kitchen counters while giving enough space for 4-6 seed trays.
Clean the container thoroughly with 10% bleach solution to kill any spores or bacteria that could infect your seedlings. Rinse well and dry completely before proceeding. If using a plastic bin, drill small ventilation holes along the sides—just enough to prevent condensation buildup while maintaining humidity. Cover with breathable mesh to keep pests out.
🌱 Step 2: Layer for Optimal Heat and Moisture Retention
Line the bottom with a 1-inch layer of vermiculite or perlite—this creates an insulating barrier that keeps soil temperatures stable. I place a seedling heat mat (set to 75-85°F) on top of this layer to provide bottom heat, which is critical for fast germination. The heat mat should cover at least 70% of the base to ensure even warmth distribution.
Add 2-3 inches of seed-starting mix—never garden soil, as it compacts and suffocates roots. Moisten it until it feels like a wrung-out sponge: damp but not dripping. Press down lightly to remove air pockets, then arrange your seed trays or cells on top. Leave ½ inch of space between trays and the container walls for airflow.
☀️ Step 3: Set Up Light and Ventilation
Place your greenhouse in the brightest spot available—a south-facing window gets 6+ hours of indirect light, but you'll need supplemental grow lights for consistent results. A T5 fluorescent fixture with 5,000-6,500K bulbs hung 4-6 inches above the seedlings works perfectly. Keep lights on a 14-16 hour timer to mimic long daylight periods.
Ventilation is non-negotiable: condensation on the lid signals trapped humidity, which breeds mold. Crack the lid 10-15 minutes daily once seedlings emerge, gradually increasing to 1-2 hours as they grow. I prop the lid open with a wooden stick to create a small gap—just enough to let stale air escape without losing too much heat.
💧 Step 4: Sow and Maintain Germination Conditions
Follow seed packet instructions for depth, but never bury seeds deeper than ¼ inch—they need light to trigger germination. Mist the soil surface with a spray bottle until evenly damp, then cover the entire greenhouse with its lid. Place a thermometer inside to monitor temperatures—70-75°F is ideal for most seeds, but some (like peppers) need 80-85°F.
Check moisture daily: the soil should stay consistently damp, but never soggy. Bottom-watering prevents disturbing seeds—place the entire greenhouse in a shallow tray of ½ inch of water for 10-15 minutes, then drain excess. Watch for first true leaves (not the initial seed leaves) to appear in 5-14 days—this tells you germination is complete and it's time to adjust care.
✂️ Step 5: Transition to Independent Growth
Once seedlings have 2-3 sets of true leaves, remove the heat mat and gradually introduce airflow by opening the lid fully for 2 hours daily. Harden off seedlings over 7-10 days by moving them to their final growing spot for 1 hour each day, increasing time incrementally. You'll know they're ready for transplant when they stand upright even after being outside overnight.
This compact greenhouse system lets you stack 3-4 levels vertically, turning a tiny space into a high-output seed-starting powerhouse. The key is consistent warmth, precise moisture, and controlled airflow—master those, and you'll outpace any neighbor with a sunroom.
Tips & tricks for perfect seed starting greenhouses
Here's what nobody tells you about squeezing maximum performance from compact germination setups.
Heat Mat Placement: Position your seedling heat mat so it covers at least 70% of the base, but avoid letting it touch the container walls. I've found that leaving a ½-inch gap around edges prevents heat loss while ensuring even warmth distribution across all seed trays. The 75-85°F range is critical—peppers and tomatoes particularly benefit from the higher end, while lettuce and herbs thrive at the lower end.
Lighting Strategy: For that 14-16 hour light cycle, I recommend using a timer with a gradual fade function rather than abrupt on/off switching. This mimics natural sunrise/sunset and reduces stress on seedlings. Place your T5 fixture 4-6 inches above the seedlings, but adjust as they grow—you'll want to maintain that distance to prevent leggy growth.
Ventilation Timing: That initial 10-15 minute daily venting is crucial once seedlings emerge. I start with just a small crack in the lid, then gradually increase to 1-2 hours as seedlings mature. The key is to watch for condensation—if you see heavy fogging on the lid, you're not ventilating enough. A wooden stick works perfectly for creating that precise gap without letting pests in.
Stacking Safety: When stacking 3-4 levels, place the heaviest containers on the bottom and use non-slip mats between layers. I've learned this the hard way—after a wobbly stack collapsed on my seedlings! Also, leave 1-2 inches of space between stacked units to allow for airflow circulation between levels.
Pro Tips for Small Seed Starting Greenhouse
- Here's what nobody tells you about squeezing maximum performance from compact germination setups.
- Heat Mat Placement: Position your seedling heat mat so it covers at least 70% of the base, but avoid letting it touch...
- Lighting Strategy: For that 14-16 hour light cycle, I recommend using a timer with a gradual fade function rather tha...
Frequently asked questions
Got questions about your small seed-starting greenhouse?
You’re not alone! Here are answers to the most common concerns—from setup to troubleshooting—to help you grow with confidence.
What’s the best time to start seeds in a small greenhouse?
Timing depends on your climate and crop type. For most veggies, start 6-8 weeks before the last frost date. Leafy greens (like lettuce) can go in earlier, while tomatoes and peppers need warmth—wait until temps are consistently above 50°F (10°C). Check your seed packets for specifics!
How do I protect seedlings from cold snaps or heatwaves?
Use a thermostat fan or heating mat for chilly nights, and shade cloth (30-50%) during heatwaves. Ventilation is key—crack a window or add a small exhaust fan to prevent overheating. Monitor humidity too; seedlings thrive at 40-70% humidity.
Are there budget-friendly alternatives to a dedicated greenhouse?
A clear plastic storage bin with a lid, a repurposed fish tank, or even a DIY frame covered in plastic sheeting work great. Add a grow light (LED bulbs are energy-efficient) and a seedling heat mat for warmth. Just ensure good airflow to avoid mold!
How do I prevent pests and diseases in a small greenhouse?
Start with sterile soil and avoid overcrowding. Inspect seedlings daily for aphids or fungus gnats—spray with neem oil or insecticidal soap if needed. Rotate seeds to improve airflow, and remove any yellowing or wilting leaves immediately to stop disease spread.
Why aren’t my seeds germinating? Troubleshooting tips!
Check these first:
- Moisture: Keep soil consistently damp (not soggy). Use a spray bottle for fine seeds.
- Temperature: Most seeds need 65-75°F (18-24°C). A heat mat helps.
- Light: Seeds need light after sprouting—place under a grow light or in bright indirect sunlight.
- Depth: Follow packet guidelines (usually 2x seed size deep). Too deep = struggle!
Wrapping up and next steps
A small seed starting greenhouse is your secret weapon for turning tiny spaces into thriving seedling havens! 🌱 Whether you’re working with limited square footage or just love efficient gardening, these compact setups help you maximize germination potential while keeping costs low.
With the right materials, a little creativity, and the tips shared here, you’ll be well on your way to strong, healthy starts—ready to conquer your garden come spring.
Now that you’re armed with the know-how, take the next step! Start small with a DIY project, or invest in a pre-made greenhouse to see what works best for your space. Happy planting—your future plants will thank you! 🌿