
Propagation
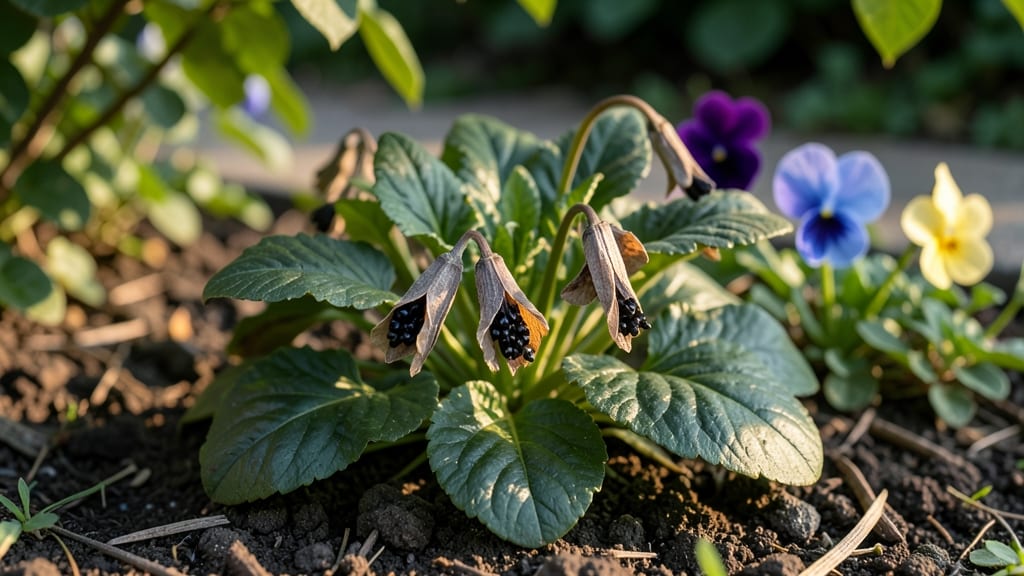
Harvesting viola seed pods turns a summer cleanup into a year-round treasure trove of free plants. 🌿 These little green lanterns hold the secret to multiplying your violas without spending a dime—if you know when and how to collect them.
I’ve saved seeds from my garden for three years now, and the trick is all in the timing and a little patience. The pods ripen unevenly, so check weekly once they start turning brown. A mature pod feels dry and papery, with seeds rattling inside—just give it a gentle squeeze.
Collect them before they split open or the seeds scatter, and store them in a cool, dry place until spring. Viola seeds don’t need fancy stratification; just a few weeks of cold exposure mimics winter and triggers germination. By spring, you’ll have dozens of tiny seedlings ready to transplant.
The key is keeping them consistently moist until their first true leaves appear—then watch them bloom faster than store-bought plants. No more buying flats of violas when you can grow your own from last year’s harvest. Works for violas in containers, garden beds, or even windowsills.
Here’s how to make the most of those seed pods without the fuss.
📚 In This Guide
- What you need
- Instructions
- Tips and common mistakes
- Wrapping up and next steps
What you need
- ● Mature Viola plants: Healthy, flowering plants (e.g., Viola odorata, Viola tricolor, or Viola cornuta) with fully developed seed pods (brown, dried, and slightly papery). Aim for 5–10 plants for a good yield.
- ● Pruning shears or sharp scissors: 1 pair (sterilized with rubbing alcohol to prevent disease spread).
- ● Paper bags or breathable seed envelopes: 5–10 bags (brown kraft paper works best—avoid plastic to prevent moisture bucketing). Label each with the viola variety and harvest date!
- ○ Tweezers or small forceps: 1 pair for gently extracting seeds from pods (optional but helpful for delicate varieties).
- ● Flat tray or baking sheet: 1 (for drying pods if harvested early). Line with parchment paper.
- ● Fine-mesh strainer or sieve: 1 (for separating seeds from chaff during cleaning).
- ● Small funnel: 1 (to transfer seeds into storage containers neatly).
- ● Air-tight seed storage containers: 2–3 containers (glass jars with tight lids or resealable plastic bags with silica gel packets for humidity control).
- ● Hand lens or magnifying glass: For inspecting seed viability (look for plump, firm seeds).
- ● Desiccant packets: Place 1–2 in storage containers to absorb excess moisture.
- ● Notebook or seed-tracking app: To log harvest dates, germination rates, and plant traits for future reference.
- ● Spray bottle with water: For lightly misting pods if they’re too dry during harvest (use sparingly!).
- ● Gloves: 1 pair (nitrile or latex) if handling large quantities to avoid skin oils contaminating seeds.
How to harvest viola seed pods for reliable germination
Violas reward patience with vibrant blooms and easy seed collection—here’s my foolproof method.
🌿 Step 1: Identify and Select Mature Seed Pods
Look for seed pods that have turned from green to a dry, papery brown—this means they’re fully mature and ready for harvesting. I always check my violas in late summer or early fall when the blooms have faded and the pods are plump but brittle. Avoid harvesting green pods; they won’t contain viable seeds and will spoil quickly.
Gently twist or pinch the pod between your thumb and forefinger to release it from the stem. If it resists, wait another day or two—overripe pods crumble at the slightest touch. Place the pods in a paper bag or envelope to keep them dry until you’re ready to process them. This prevents moisture buildup, which can cause mold.
💧 Step 2: Dry and Store Seed Pods Properly
Spread the harvested pods on a clean, dry surface in a single layer. I use a mesh screen or an old window screen to allow airflow while keeping them contained. Place them in a warm, dry spot away from direct sunlight—think of a sunny windowsill with indirect light or a well-ventilated shelf. This takes about 7-10 days until the pods are completely dry and brittle.
Once dry, store the pods in a sealed paper envelope or small glass jar in a cool, dark place. Label the envelope with the variety name and harvest date—this helps track seed viability over time. Viola seeds stay viable for about 2-3 years when stored properly, so don’t rush the drying process. Patience here means better germination later.
✂️ Step 3: Extract and Clean the Seeds
When the pods are fully dry, gently crush them between your fingers or use a small hammer to break them open. Viola seeds are tiny and black, often mixed with fine chaff. I like to spread the crushed pods on a clean sheet of white paper—this makes it easy to spot the seeds against the background. Use a fine-mesh sieve or a soft paintbrush to separate the seeds from the debris.
Discard any discolored or shriveled seeds—they won’t germinate. Store the clean seeds in a small, airtight container like a pill vial or envelope. Keep them in a cool, dry place until you’re ready to sow them. Viola seeds are light-sensitive, so avoid exposing them to bright light during storage to maintain viability.
🌱 Step 4: Sow the Seeds for Next Season
Viola seeds need light to germinate, so don’t bury them deeply. Sprinkle them lightly on the surface of a moistened seed-starting mix in a shallow tray. Press them gently into the soil so they make contact but aren’t covered. Mist the tray lightly with water to keep the soil evenly moist—never soggy. Place the tray in a warm spot with indirect light, like a sunny windowsill or under a grow light.
Germination can take 2-4 weeks, so be patient. Keep the soil consistently moist but not waterlogged—this is the most critical part of the process. Once seedlings emerge, thin them to 1 inch apart to give each plant enough space to grow. Viola seedlings are delicate, so handle them carefully to avoid damage.
Tips & tricks for perfect viola seed pod harvesting
Harvesting viola seed pods is all about timing and gentle handling—here's how to avoid common pitfalls and get the most viable seeds possible.
Selection Tip: In Step 1, when checking for mature pods, look for that specific dry, papery brown color—it's your green light for harvesting. I've learned the hard way that harvesting too early (green pods) or too late (overripe, crumbling pods) both ruin your seed yield. The pods should release easily when gently twisted but not fall apart at the touch. If you're unsure, wait another day—patience here means better germination later.
Drying Strategy: For Step 2, the 7-10 day drying period is non-negotiable for seed viability. I like to place my mesh screen setup on a baking rack in my kitchen—this creates airflow from below while keeping the pods contained. If you're in a humid climate, you might need to extend the drying time slightly, but never use heat sources like ovens or heat lamps. The goal is to dry them slowly and evenly, not cook them.
Seed Extraction Trick: When crushing the pods in Step 3, use a clean sheet of white paper—not dark colors! The tiny black viola seeds will be nearly invisible against anything but white. I've also found that using a small hammer wrapped in a thin cloth prevents seed damage while making the crushing process easier. Once you've separated the seeds, store them in the darkest container you have—even a simple matchbox works if wrapped in foil.
Germination Hack: For Step 4, the light requirement is crucial—these seeds won't germinate if buried. I've had the best success using clear plastic seed trays with domed lids (the kind used for seed starting). Remove the lid daily for 10 minutes to prevent condensation buildup, which can cause mold. The seeds will look like tiny black specks on the soil surface—don't be fooled by their size, they pack a germination punch!
Pro Tips for Viola Seed Pods
- Harvesting viola seed pods is all about timing and gentle handling—here's how to avoid common pitfalls and get the mo...
- Selection Tip: In Step 1, when checking for mature pods, look for that specific dry, papery brown color—it's your gre...
- Drying Strategy: For Step 2, the 7-10 day drying period is non-negotiable for seed viability. I like to place my mesh...
Frequently asked questions
Got questions about harvesting and handling viola seed pods? You’re not alone! Here are some common queries—and their answers—to help you navigate the process like a pro.
When are viola seed pods ready to harvest?
Viola seed pods typically mature 6–8 weeks after flowering, when they turn brown, dry, and papery. If they split open or release seeds easily, harvest them immediately—delaying too long risks seed loss or poor viability. Check pods daily during peak maturity for the best results!
How do I know if the seeds inside are still viable?
Fresh viola seeds should be plump, dark, and firm. If they’re shriveled, discolored, or crumbly, viability drops. For extra peace of mind, test a few seeds on damp paper towels—if they sprout within 7–10 days, your batch is good to go! Store unused seeds in a cool, dry place for up to a year.
What if my viola seed pods won’t open naturally?
If pods stay closed, gently squeeze or tap them over a bowl to release seeds. Avoid cutting open healthy pods—this can damage the delicate seeds inside. For stubborn pods, place them in a paper bag for 24 hours; the seeds will often fall out on their own.
Can I save seeds from hybrid violas?
Hybrid violas (like those with double blooms) may not produce true-to-type seeds. For consistent results, opt for open-pollinated varieties or buy seeds from reputable growers. If you’re experimenting, plant a few seeds—you might still get surprises!
How should I store harvested viola seeds?
Keep seeds in a sealed envelope or airtight container with a desiccant packet (like silica gel) to prevent moisture. Label with the variety and harvest date, then store in a cool, dark place (like a fridge). With proper care, seeds stay viable for 1–2 years.
Wrapping up and next steps
Harvesting viola seed pods doesn’t have to be a seasonal challenge—with the right tools and timing, you can enjoy a steady supply of viable seeds year-round! 🌱 Whether you're a seasoned gardener or just starting, these simple steps make the process stress-free and rewarding.
Now that you’re equipped with the knowledge, why not take the next step? Try harvesting a few pods this week, experiment with drying methods, or even share your newfound expertise with fellow plant enthusiasts. Happy growing!